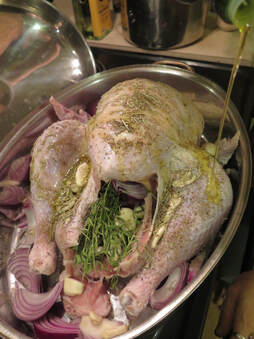
 Organic Turkeys available at our store Organic Turkeys available at our store How To cook a Turkey Relax...This is easier than you think. I’ll help you break down this daunting task step by step and before you know it you’ll have that perfectly golden bird on the table and everyone will be drooling with fork and knives in hand. What you will need: A chef knife, and a roaster. The ideal roaster is a stainless steel roaster with a lid. If you don’t have this you can use a pan with aluminum foil which you will “tent” so it doesn’t stick to the skin. (remember- aluminum is NOT ideal to cook with...next year consider investing in a roaster). Step 1: Pour a glass of wine. Or whatever your choice of relaxation may be. This can be a fun process if you let it! Step 2: Put the bird in the sink. This will contain all the juices and make for an easy clean up later. Step 3: Take the tie off the ends of your turkey if you have it. Most turkey’s have plastic or string ties keeping the legs together for packaging and shipping. Step 4: Take out the “giblets” and innards if your turkey has it. The outside of your package will usually say if your turkey includes the “giblets”. But just in case...put your hand in the cavity and pull out the neck and bag of organs. SIDE NOTE: So what do you do with these things? You can put them in a sauce pan with water, bring to boil and simmer for an hour or so. This broth can be used for making stuffing or gravy later. Step 5: To stuff or not stuff. If you are stuffing the cavity of your bird now is the time. If you are putting stuffing in it you will fill it (not too tight!) and remember to add 30mins to an hour cook time (depending on the size of your bird). If you are putting fresh herbs, onion, garlic in your turkey you will do this loosely and remember to add 15-30mins cook time (depending on the size of your bird). Step 6: Season the skin. Add your dry seasonings to the breast of your turkey and massage it into the skin a bit. Then drizzle with olive oil on the turkey and the seasonings around the base of it in the pan (approx ¼ c). Try these seasonings- sage, thyme, margarom, terragon, rosemary, garlic, onion Step 7: Cover and Cook. Put the lid on your roaster and put the bird in the oven. So how long are we cooking this for you ask? That depends on a few things. For those who want to cook “low and slow” overnight you will be putting the oven at 175-200degrees and cooking for 10hours overnight. This requires a minimum of 2-3 bastings (this means you scoop up the liquid “drippings” from the bottom of the pan and pour it over the bird to moisten it as it cooks). OR Do the traditional cooking time of approximately 15mins per pound at 325degrees. My personal preference is to start out slow with a temp of 275 degrees the first hour then bump it up to 350degrees for the remaining cook time. This method ensures it is cooked all the way through without drying it out. It may require an additional 15-30mins of cook time (depending on your bird size). Step 8: Finish the skin. For the last 20-30mins you will want to take the lid off and let the skin “Golden” up a bit and become crispy. TIPS: Don’t rely on the plastic “pop up” to determine if your bird it done. You will know you are getting closer to “done” when it smells done (yes really!). You can test a small patch for doneness by poking a small hole in the joint where the thick leg meets the body. If the juice is too red….it needs more time. Be careful not to do this too much as you will lose your moisture! An average size bird (10-12lbs) should take approximately 3-3 1/2hours cooking unstuffed traditionally. If using fresh onion and garlic put some inside the turkey and some around the base. Tuck garlic in between the wings and legs. If your are not using your giblets for stuffing or gravy remember your pets would LOVE to have some of this cooled off broth drizzled over their food! If you are using a quality stainless steel roaster you will not need to baste your turkey- but if you use a cheap pan with aluminum you will need to baste it at least once an hour. Remember to let your turkey cool with the lid off out of the oven for at least 20-30mins before cutting (it’s actually finishing cooking without burning during this time.) Happy cooking!
0 Comments
|
Natural Living BlogAuthorOur store owner Lisa Piper is a Certified Raw Food Chef, Nutritionist and Herbalist all while teaching cooking classes and providing Consults. However, Jeff enjoys blogging from time to time also. : ) Archives
August 2024
Categories
All
|


 RSS Feed